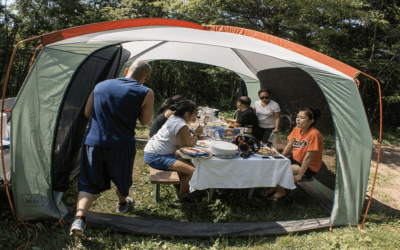
What you bring for your camp kitchen will, obviously, shift contingent upon what sort of excursion you’re arranging and your culinary inclinations. On the off chance that you think of yourself as a campsite connoisseur, setting up your camp kitchen may very well be one of the features of your outing.
Whether you’re a novice or experienced camper, it’s consistently a smart thought to help yourself remember some essential kitchen rules. You can utilize this comprehensive list as a beginning stage—at that point, you can tweak it to coordinate with your style and outing.
Expert Tips to Pick the Best Camp Kitchen On A Budget
There are also awful camping facilities, such as outdoor tables and tailgates with which we do everything. Typically, they are not comfortable, effective, or adjustable for culinary. You can have a hard time, have to clean spills from your auto upholstery, or want a restaurant to free you of your cookery tasks. Our team compiled a list of the top expert tips to pick the best camp kitchen on a budget in detail to help you invest in the right brand.
1.The Ideal Counter Height
Workspace tallness is truly significant. You will discover that exercises like cleaving vegetables or making sandwiches are more slow or awkward when working at an outdoor table or overlaying a camp table. Taller people will have a slightly awkward curve in their back remaining at a table. When finding a spot at the table, your elbows disrupt the general flow and slow you down. That is the reason kitchen counters are taller than kitchen tables.
In case you attempt to cleave vegetables or make sandwiches on a cooler, on the hood of your apparatus, or a rear end, it’s downright baffling because you’ll normally be working at abnormal tallness on an insecure surface. The standard tallness for kitchen counters is 36″. Moreover, the ideal counter height is 2-3″ beneath your elbows.
Most camp kitchens have a height raised over a standard table, yet at the same time under a kitchen counter. This is fine since longer camp kitchen legs imply more material, which implies that the camp kitchen will gauge more, and one of the highlights we truly need is lightweight. Along these lines, the ideal counter stature that we search for is 32-36″.
2.Stove Positioning
From the counter to the highest point of the oven grind, people like to see a distinction of 0-2″. This is quite typical for a standard kitchen. With the wide range of ovens and camp kitchens accessible, it’s difficult to decide how your specific oven will set up in a specific camp kitchen.
An ordinary propane oven is around 3″ from base to grind, and a normal white gas oven is presumably 4″ from base to grind. This implies that preferably, the kitchen will have a recessed zone or lower table to put the oven. Some like this game plan since it keeps the ledge, oven, pots, and container at a similar relative stature to one another. This should make cooking more effective and more secure.
An oven should go on a fireproof mesh or table made of metal. Most ovens shouldn’t get adequately hot to consume whatever is under them, yet this is an essential security highlight that holds you back from torching the timberland coincidentally.
Some oven surfaces are just a wire matrix with 2-3″ separating. This keeps the oven surface lightweight, yet a few ovens have feet and projections that cause them to sit gracelessly on the oven surface. In case you purchase a camp kitchen with one of these wire-matrix surfaces, ensure you watch that your oven sits without wobbling. If you have an issue, you can zip-attach an enormous square shape of flimsy metal to the framework to make a decent level table for your oven.
Finally, people like the fuel hotspot for the oven to be secure and far removed. A few ovens utilize a little propane canister that hangs from the oven. For certain camp kitchens, this canister will linger palpably. While the makers regularly show this in item pictures, we believe it’s smarter to tie down this piece of the oven to the camp kitchen with a hose clamp, Velcro, or zip-tie.
3.Plan Your Workspace
Some camp kitchens have few work regions and make the oven the focal component. This is insane on the grounds that having a huge counter is valuable for hacking products of the soil, preparing, washing dishes, making sandwiches, pouring espresso, making cereal, opening jars, and huge loads of other stuff. You don’t need an oven in that work zone. Most work territories are 20″ profound, and we like a length of around 30″. Once more, this is a decent trade-off on weight and size.
Work regions would in a perfect world be made of plastic or tempered steel. This isn’t generally the situation with less expensive camp kitchens. However, ledges made of wood composites like water-safe MDF are ideal for this.
This is fine in case you’re cautious with your kitchen. You shouldn’t allow it to remain dousing wet from dishes, and don’t leave it alone in the downpour continually. The highest points of these MDF ledges will not drain downpour. However, the corners will so be generally cautious about keeping corners dry.
4.Sink for A Camp Kitchen
Who doesn’t adore camp kitchen sinks? A camp kitchen sink can change your camp cooking from disappointing to merry. There are two kinds of camp kitchen sink: fabric and plastic tubs. A fabric sink is simply uncompromising waterproof nylon sewn into a container shape that you can load up with water. These sinks presumably cut the heaviness of your kitchen several pounds and crease up in a level shape. The best fabric sinks can have significantly higher volume than a plastic sink, also.
We should contrast that with a plastic sink. A plastic camp kitchen sink is cumbersome and will commonly hold less water. The profundity of the sink is one of the deciding variables in how minimally your camp kitchen will crease up. All things considered, a plastic sink will be more sturdy and will not be handily harmed by hot containers or sharp blades. Something enormous you will like about plastic sinks is that you can dry them out. This implies you will get together a wet sink that could get rank on the off chance that you need to get together and hit the path early.
A few sinks accompany an advantageous channel. This makes exhausting it much simpler – the option is to lift up your sink and convey it to a dump spot. Water generally weighs 8 lbs. per gallon, so even a little sink can be somewhat cumbersome. In the event that a sink holds 4 gallons of water, be aware of the amount you top it off.
You need to ensure that you’re not depleting your sink where you shouldn’t. Bunches of outdoor territories don’t need you unloading gross wash water any place. A few groups manage this by depleting the sink straightforwardly into a container that can be unloaded in a proper spot. Try not to dump close to water sources and stay 50 yards from streams, lakes, and waterways.
5.Organization Plan
The organization factor since you have so little space. You ought to ask yourself, “Where will I put the following things:”
- towels
- paper towels
- dishcloths
- spatulas, spoons, and other cooking things
- flavors and spices
- pots and container
- cutting boards
- plastic and foil wrap
- a lamp
- trash
It makes things such a ton simpler when everything has its own place. Some camp kitchens have fabricated places to deal with the above-mentioned: towel racks, trashcans, and spice racks. Professionals know that lighter camp kitchens experience difficulty putting away hefty things like Dutch ovens on their racks.
Once more, this is a compromise between a lightweight camp kitchen and its capacities. A truly planned camp kitchen will have a windscreen that fuses a portion of the above which viably extends a portion of your working regions.
6.Perfect Wind Protection Measures
Individuals like camp kitchens that have windscreens. A windscreen makes numerous things a lot simpler, particularly if it’s well-planned. On the lopsided ground, you can arrange your kitchen so the entirety of your moving, round things like eggs, onions, and oranges will move towards the windscreen rather than onto the ground.
A windscreen will shield your food from dust and residue. What’s more, one thing you will truly appreciate is that it’ll stop chip sacks and food coverings from fluttering in the breeze. Regardless of whether it’s protected, people are constantly scared by store meat coverings being whipped by the breeze. It generally seems like our cut turkey will take off and splat into the soil.
With a windscreen, these fits of anxiety are a relic of past times! At last, a truly incredible windscreen will hold things on it like flavor racks and utensil snares. The additional association will change that it is so natural to cook during camp.
7.Testing Phase
At the point when you purchase your camp kitchen, you need to test it before you use it for a couple of reasons. In the first place, they are seldom bundled well and can get beat up in transportation. You need to ensure that nothing is bowed, that all pivots and joints work easily, and that adornments connect accurately.
Then, whip out your oven and set it up. Ensure it fits on the assigned oven space. On the off chance that it’s on a wire matrix, ensure that it doesn’t wobble unstably. At last, you need to set it up without precedent for great light with low pressure, not at the exact minute after maneuvering into camp.
This will likewise reveal to you that it is so easy to set up. Most camp kitchens should require 5 minutes or less to set up and separate. For weekend excursions, or outings, where you stay in one spot for quite a while arrangement time, will not make any difference so much. However, in case you’re on a fourteen-day rough terrain trip where you camp at an alternate recognizes each night, you will fear a muddled kitchen set up with the wide range of various camp undertakings you need to finish.
Less expensive camp kitchens don’t have customizable feet, so you need to carry something to shim the kitchen’s feet. Customizable feet make this significantly simpler, particularly in the rough territory, yet they do add to the general load for the components inside the legs.
8.The Ideal Weight
Professionals truly esteem lightweight in their 4×4 outdoors gear. People have encountered four-wheeling with a hefty apparatus, and it’s simply harder. Stuff breaks more, it’s simpler to stall out, and it’s harder to get unstuck. So, you will like to utilize the lightest stuff conceivable that will, in any case, give us great usefulness.
The ideal camp kitchen for use presumably weighs in any event 15 lbs. more than one that is “sufficient” (and costs much more cash). Likewise, a camp kitchen must be taken out and put in your apparatus continually, and more modest, lighter kitchens make this simpler. A sensible weight is around 25-35 lbs. A camp kitchen of this weight will have a lot of highlights, aluminum development and will presumably overlap up to 40″ x 20″ x 6″ or more modest. Check our guide about the differences between buy vs build a camp chuck box on terms of budget, comfort & performance.
Some camp kitchens crease into a bag shape, which implies they will slide effectively into your 4×4. Others have distensions to oblige their highlights. Shockingly, you likely will not have a lot of decision looking like your kitchen in the event that you discover one with truly incredible highlights, however a strange shape.
9.Good Utensils
Pots
The pots and dishes you need are to a great extent dictated by the kinds of food sources you like to eat on an outdoor trip and your cooking rig. In the event that you like to cook a mutual bean stew and spoon out a feast for the whole family, decide on an enormous heater, Dutch burner stove, or outdoors broiler for the majority of your suppers.
Add a more modest pan and a skillet to brown your meat or veggies, and consider it daily in the event that you need a smoothed-out activity. A more modest pot can be utilized to warm water for hot refreshments, like cocoa or tea. Add an outdoor pot in the event that you anticipate loads of tops off or plan on fermenting espresso outside.
For over-the-fire cooking, cast iron cookware is an unquestionable requirement. Add huge utensils or warmth-safe gloves to the pack to guarantee you can securely eliminate your skillet from grates over the fire. At the point when you are flying performance, select more modest pans and skillets for your cooking needs, and perhaps leave the outdoors iron at home.
The more modest surface territory implies quicker cooking, faster cleanup, and more minimized stockpiling. These can likewise be helpful on the off chance that at least one of your gatherings has dietary limitations, as an individual skillet can forestall cross-pollution for without gluten campers or individuals with hypersensitivities.
Utensils
Cooking utensils rudiments incorporate spatulas for your meat, hotcake, and egg-flipping needs. Choose a wood or bamboo spoon or an elastic spatula for blending in a pan. These equivalent spoons can be utilized for blending during supper prep to reduce your heap. Utensils and meat sticks are extraordinary for open-fire cooking or broiling in a simmering dish and can pull twofold obligation with a burner set up.
Forte things, like whisks, can be added on the off chance that you plan out your dinners ahead of time and can legitimize the need through recurrent employments. Something else, consider on the off chance that you need the thing or another utensil that can have its spot. For instance, a fork can whisk eggs alright for most cooking needs. You might have the option to buy an outdoor utensil set, so you don’t need to buy the pieces independently.
Knives
In case you are cooking meat, take a huge culinary expert’s blade in the event that you need to cut a chicken or bigger cuts of meat. It would help if you likewise took a couple of more modest steak blades for eating. The best outdoors blade sets incorporate honing cases to keep the blades protected and sharp between employments.
A medium-sized gourmet specialist’s blade with a cutting board case is a strong choice for cutting veggies and other food things and remembers a worked-for capacity arrangement. Likewise, it would be best if you searched for a multi-reason blade with an underlying wine tool and other fundamental utility instruments to try not to be left with a container of wine and no real way to open it.
10.Easy Cleaning
The best outdoor kitchens give a blend cooking surface and counter territory. They can be utilized related to a propane oven or fill in as an assistant to open-air fire cooking. With foldable counter extensions and staggered stockpiling, they are helpful for setting up for singular dinners just or leaving all set for numerous long stretches of cooking.
The arrangement should be cleaned and disinfected after every prep to eliminate cooking scents. You can enlarge them further by adding an outdoor kitchen coordinator for expanded capacity. To keep bugs and creatures out of your campground, ensure you have the gear to store your food securely.
Pick an option that is harmless to the ecosystem and a biodegradable dish cleanser to tidy up after each dinner. You need to kill the smell of food on the entirety of your cooking stuff and surfaces to try not to pull in creatures. On the off chance that you are exploring the great outdoors close to your vehicle, pack your perfect cutting boards, utensils and dish away in an impenetrable compartment in the vehicle while you are dozing.
Store your pre-owned scouring apparatuses, like a dishcloth and wipe, in an odor-free pack. Additionally, store your potholders and some other cooking embellishment equipped for engrossing scent in a shut holder and store the compartments at any rate 200 feet from your tent.
Utilize your containers to store any readied food and store those compartments inside a cooler or impenetrable holder. Spot those compartments in your vehicle around evening time whenever the situation allows, or store them away from the dozing region. Note: pet food should be put away in a similar path as human food.
In zones with bears, bear canisters are utilized to store all food things, including trash, away from the campground. These give a scent obstruction and are likewise carefully designed for meddling nuisances. Notwithstanding the additional boundary these canisters give, they actually should be gotten a protected separation from your dozing quarters.
Keep the entirety of your waste, including unused or extra food, securely fixed with you until you arrive at an outdoors zone with dumpsters. Peruse all presented signage to guarantee you can discard food things or non-food things in the dumpsters prior to disposing of your trash.
What Is the Bottom Line Here?
Cooking during an open-air outdoor trip can be loads of fun and keep you and your family significantly better out and about. With the least fundamentals, you can set up a reasonable, delectable dinner or scale up for a connoisseur experience as your payload space and back permits. Now, you know the best ten tips for assembling the right camp kitchen and having fun on your trip. You can research on your own and come up with more ways to choose the right items or plans for yourself. The choice is yours.